Nutanix Frame provides access to a Windows desktop running in the cloud, giving you access to Questrom software from virtually any computer without requiring local installation.
Before launching Frame
BU Login required
Duo authentication required
Runs in a supported web browser
Save permanent files in Documents
Recommended browsers
Safari, Firefox, or Microsoft Edge
Save files correctly
Files in temporary upload locations may be deleted when your session ends. Save files in Documents.
Sign In and Open an Application
Follow these steps to sign in to Nutanix Frame, complete authentication, and open the application you need.
1
Step 1- Nutanix Frame Login
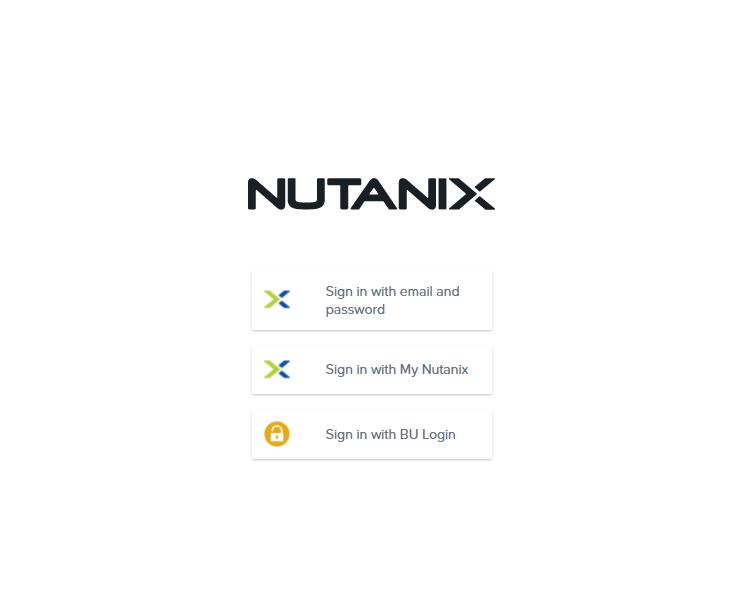
Sign in with BU Login
Select “Sign in with BU Login”, then enter your BU email address and Kerberos password.
2
Step 2 - SELECT AN APPLICATION
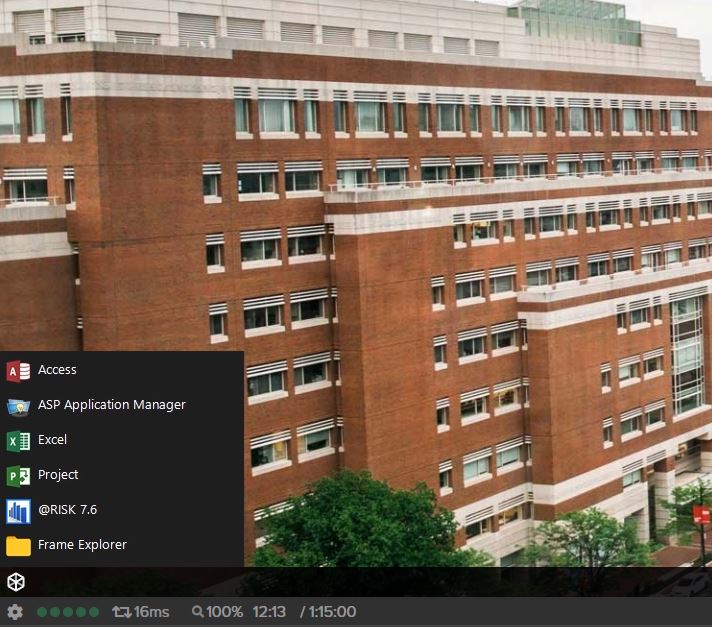
Select the application you want to open
Frame Explorer is shown in this example.
3a
3c
3b
Step 3 - Complete Frame Sign-in
3a
BU Email
Enter your BU username without @bu.edu
3b
Kerberos Password
Enter your Kerberos password
3c
Sign In
Select Sign In to start the session
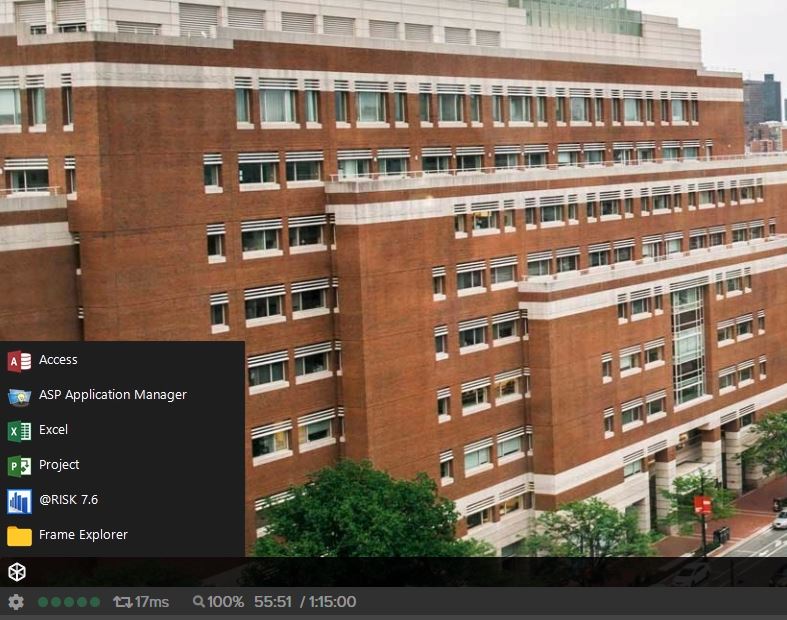
Switching Applications
Use the Frame application menu to switch between available applications without ending your session.
1a
1b
Step 1 - switch applications
1a
Open the application menu
Select the applications icon in the lower-left corner of the Frame window
1b
Choose another application
Select the application you want to open. Excel is shown in this example
Upload files from your Computer to Frame
Use the Frame toolbar to upload a file from your computer into the current virtual desktop session.
Upload a file in three steps
Open the expandable toolbar at the top center of the Frame window.
Select the Upload button.
Choose the file you want to upload from your computer.
Uploaded files are temporary
Files placed in the Uploads folder are deleted when your Frame session ends. Move any files you want to keep into the Documents folder before closing your session.
1
Step 1
Open the Frame toolbar
Select the expandable toolbar icon at the top center of the Frame window.
2
Step 2
Select Upload
Choose the upload icon from the expanded Frame toolbar.
3
Step 3
Select the file you want to upload
Select the file you want to upload from your computer, then confirm the selection.
Need to keep the file?
Move it from Uploads into your Documents folder. Files stored in Documents remain available in future Frame sessions.
Save files within Frame
Save your work in the Documents folder so it remains available the next time you use Frame.
Save a file in five steps
In your application, click on File -> Save As.
Select Browse to choose where to save the file.
Open the Documents folder.
Enter a name for your file.
Select Save.
1
2
Step 1-2 - OPEN SAVE AS
1
Open Save As
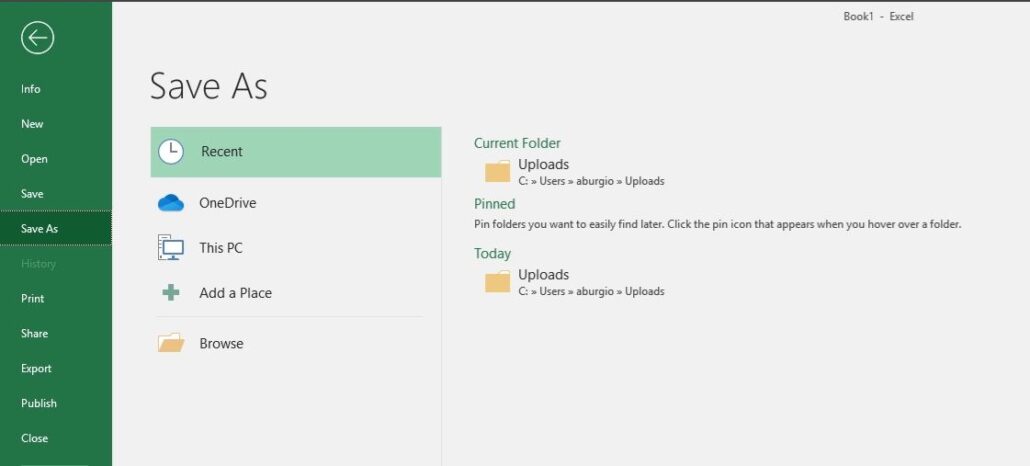
In your application, select File → Save As
2
Select Browse
Select Browse to choose a folder in Frame
3
4
5
Step 3-4-5 - SAVE YOUR FILE
3
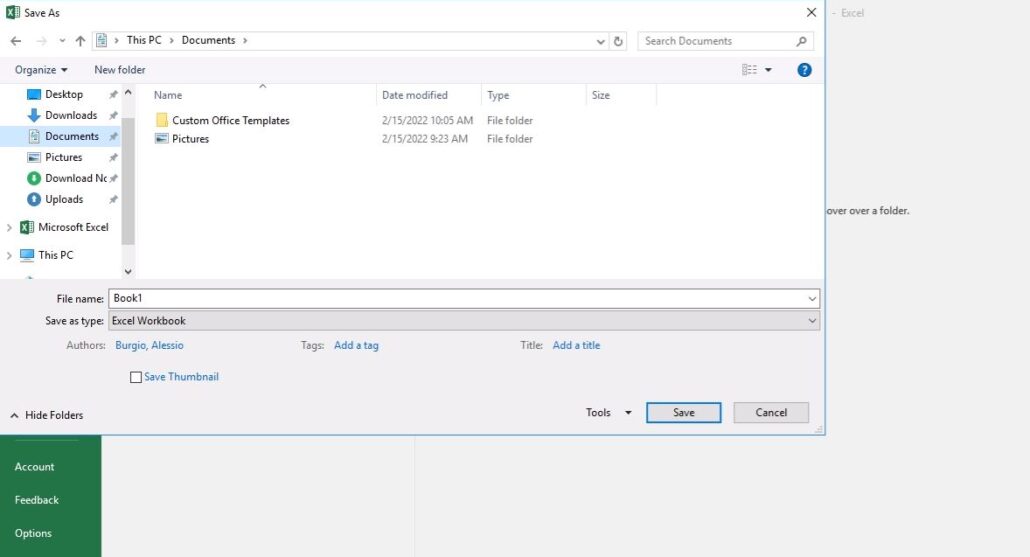
Open Documents
Select the Documents folder to keep the file for future Frame sessions
4
Name your file
Enter a name for your file
5
Save the file
Select Save to finish
Where should I save my files?
Save files you want to keep in Documents. Files stored elsewhere in the virtual desktop may be removed when your Frame session ends.
Download files to your Computer
Download files from your Frame session to your local computer before ending your session.
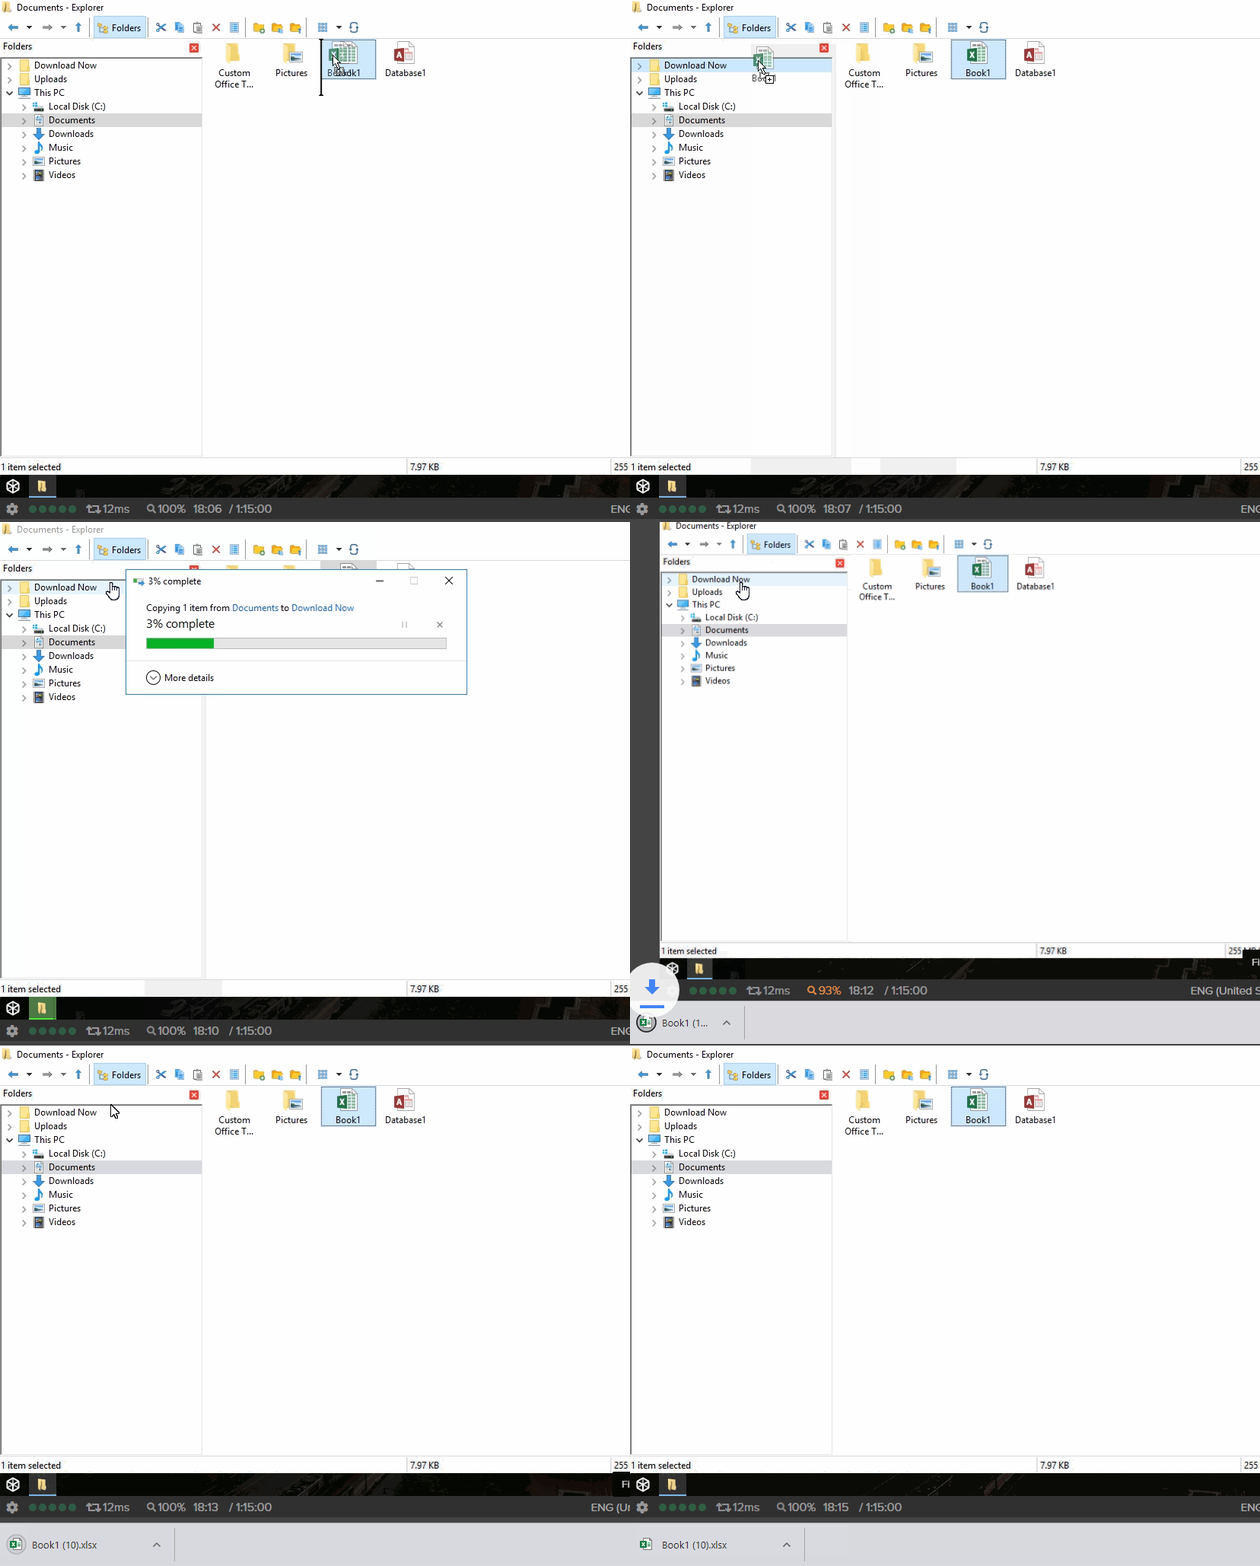
Download a file in five steps
Open the Applications menu.
Select Frame Explorer.
Open the Documents folder and locate the file you want to download.
Drag the file into the Download Now folder.
Frame will automatically download the file to your computer.
1
2
Step 1-2 - OPEN FRAME EXPLORER
1
Open the Applications menu
Select the Applications icon at the bottom-left of your Frame desktop.
2
Open Frame Explorer
Select Frame Explorer from the Applications menu.
Step 3-4-5 - DOWNLOAD YOUR FILE
Open Documents
Open the Documents folder and locate the file you want to download.
Move the file to Download Now
Drag your file into the Download Now folder.
Download completes automatically
Frame will automatically download the file to your computer.
Open uploaded files
Open files you previously uploaded from your computer to your Frame session.
Open uploaded files in five steps
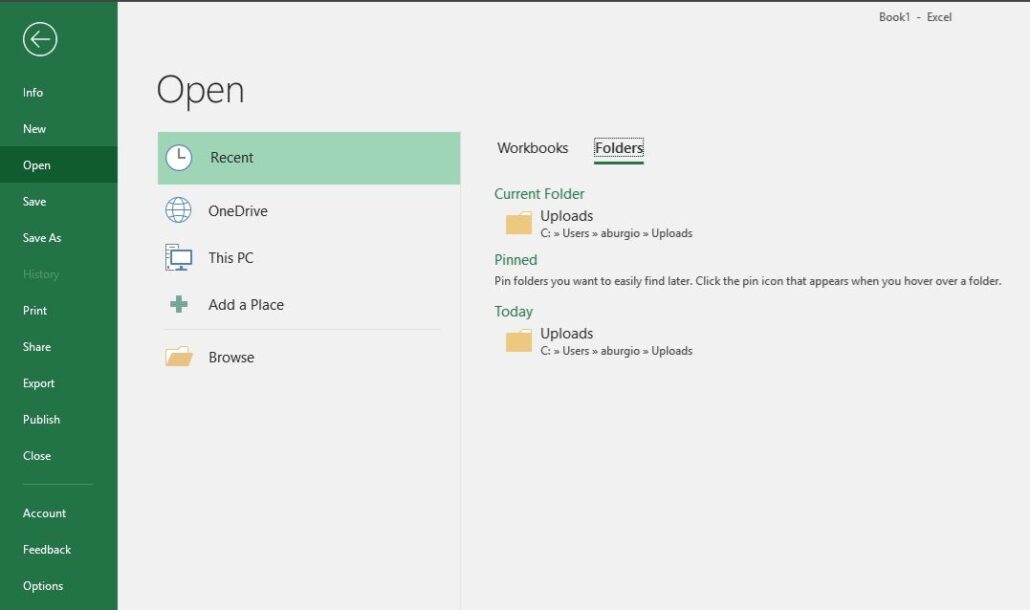
In the application you are using, select Open.
Select Browse.
Open the Uploads folder.
Select the file you uploaded.
Select Open.
Uploaded files are temporary
Files placed in the Uploads folder are deleted when your Frame session ends. Move any files you want to keep into the Documents folder before closing your session.
1
2
Step 1-2 - BROWSE FOR YOUR FILE
1
Open a File
From the application you are using, select Open.
2
Select Browse
Select Browse to open the Frame file browser.
3
4
5
Step 3-4-5 - OPEN YOUR UPLOADED FILE
3
Open the Uploads folder
Select Uploads from the file browser.
4
Select your file
Find and select the file you previously uploaded.
5
Open the file
Select Open to open the file in your current application.
Uploaded files are temporary
Files in the Uploads folder are deleted when your Frame session ends. To keep a file for a future session, save it to the Documents folder.
Add Data Science to Excel
Enable the RSP Excel Add-in in your Frame session to access the Data Science tools in Microsoft Excel.
Enable the Data Science add-in in seven steps
Close Excel if it is currently open.
Open the Applications menu.
Select ASP Application Manager.
Select Register RSP Excel Add-In.
When the confirmation message appears, select OK.
Select Exit to close the Application Manager.
Open Excel. The Data Science tools will now appear as a tab in Excel.
Important Notice
You must repeat this process each time you start a new Frame session.
2
3
Step 1-2-3 - OPEN APPLICATION MANAGER
1
Close Excel
Close Excel before registering the add-in.
2
Open the Applications menu
Select the Applications icon at the bottom-left of your Frame desktop.
3
Open ASP Application Manager
Select ASP Application Manager from the Applications menu.
4
Step 4 - REGISTER THE ADD-IN
4
Register the Excel add-in
Select Register RSP Excel Add-In.
5
Step 5 - CONFIRM REGISTRATION
5
Confirm registration
When you see the successful registration message, select OK.
6
Step 6 - CLOSE APPLICATION MANAGER
6
Exit Application Manager
Select Exit after the add-in has been successfully registered.
7
Step 7 - OPEN EXCEL
7
Open Excel
Open Excel from the Applications menu.
Analytic Solver and Data Science Tabs are now available.
Data Science is ready
The Data Science and Analytic Solver tabs should now appear in the Excel ribbon.
EX Prep Add-In
Enable the EX Prep add-in in Excel within your Frame session.
Enable EX Prep in four steps
Open the Applications menu.
Select Excel.
In Excel, select the EX Prep tab in the ribbon.
Select Start to launch EX Prep.
1
2
Step 1-2 - OPEN EXCEL
1
Open the Applications menu
Select the Applications icon at the bottom-left of your Frame desktop.
2
Open Excel
Select Excel from the Applications menu.
3
4
Step 3-4 - START EX PREP
3
Open the EX Prep tab
In the Excel ribbon, select EX Prep.
4
Start EX Prep
Select Start from the EX Prep tab to begin using the add-in.
Data Science is ready
The Data Science and Analytic Solver tabs should now appear in the Excel ribbon.
Closing Your Frame Session
Properly close your Frame session when you’re finished to protect your work and end the virtual desktop session.
Close your Frame session in three steps
Select the gear icon in the bottom-left corner of the Frame desktop.
Select Close Session.
Make sure your work is saved, then select Close Session again to confirm.
1
2
Step 1-2 - CLOSE YOUR SESSION
1
Open the session menu
Select the gear icon in the bottom-left corner of your Frame desktop.
2
Select Close Session
Select Close Session from the menu.
3
Step 3 - CONFIRM
3
Confirm Close Session
Make sure your work is saved, then select Close Session to end your Frame session.
Save your work before closing
Closing your Frame session will close all running applications. Make sure your work is saved in the Documents folder or downloaded to your computer before continuing.
COMMON QUESTIONS
Quick Answers
Where should I save files I want to keep?
Save permanent files in Documents. Files in temporary locations such as Uploads may be removed when the session ends.
Can I access Frame from my personal computer?
Yes. Frame runs through a supported web browser and provides access to Questrom applications without requiring them to be installed locally.
What happens to files in the Uploads folder?
They are temporary and are deleted when your Frame session ends. Move files you need later to Documents.
Do I need to configure Excel add-ins every time?
Some Frame add-ins, such as the Data Science add-in, need to be enabled again when you begin a new Frame session.
Need help with Frame?
If you have trouble accessing Frame, opening an application, managing files, or using Questrom software, the Questrom IT team can help.